Guest Bath Floor
 Guest bath floor border is stained a light turquoise, wait 'til I uncover the final product tomorrow..............

posted by David at 4:40 PM
0 comments
![]()
![]()
Follow along as I take the reader through the home-construction hand ringer, as we build our new home in St. Croix. From the permitting; the footings, concrete floors, bond and collar beams, cement block walls and pressure treated rafter lumber. To the exposed cypress roof decking; the cistern, rainwater collection system and solar collectors to make domestic hot water. Through the entire building process, to the last of the elastomeric roof coatings, the landscaping and more....
Guest bath floor border is stained a light turquoise, wait 'til I uncover the final product tomorrow..............
posted by David at 4:40 PM
0 comments
![]()
![]()


 same hallway, looking into the house through the back door, see the stained and scored floors within, this will be cleaned up and a coat of sealer applied, wait and see............
posted by David at 4:39 PM
0 comments
![]()
![]()
 Bobby is shown here, using his small rotary machine with diamond blades, I think he was using 80 grit at first, finishing with a 120 grit metal blade.
  The master bedroom floor, shown here, is getting ground down and the slurry, or spoils of the grind, are mopped and vacuumed up with a wet vacuum system. Creating zero dust, zippo, none, he left the floor smooth and wet and clean!!
Labels: in process, m. bdrm
posted by David at 3:41 PM
0 comments
![]()
![]()
 the solar system, well, not actually the Solar System (which is substantially larger and much more complex), it is our solar hot-water-heater system, and it is installed and working, as I write. The system consists of the (from left to right) the Solar Photo-Voltaic (PV) collector as part of the system, in that the electricity that operates the circulating pump, is provided by this little unit. I put it in that cute little aluminum frame and angle mounted it to provide maximum solar gain (sunlight on-target). In this way, we use none of our own electricity ($0.48 / KWH) to power the system. If the sun doesn't shine brightly enough, the pump doesn't operate, but who needs a circulating pump if the solar Hot Water Collector isn't heating water? By the way, that big brown thing, about 4 feet wide and six feet lengthwise? That is the solar hot water collector, or, heater. The insulated feed hot water water pipe is shown entering the bottom of the collector at the right. After traveling through the collector, pushed by a very small electric motor, and so-called gravity feed, (where hot water flows uphill more easily) the heated water leaves the collector at the top left hand corner, and travels into an electric hot water heater / storage tank, in the utility room of the house. The electric, or utility power that feeds the electric hot water heater, is used for long periods of cloudy days (as if).
posted by David at 3:33 PM
0 comments
![]()
![]()


 The confluence of grout lines, scored into the concrete by my Soff-Cut cutting tool, are ready for grouting. This is the floor portion of this home building project, I am most humbled by the enormity of the task, but onward I press to the finish line.
We are using a fairly new technique on our floors, be they in the bedroom, in the hall, in the bathroom, or anywhere at all! We are using a concrete staining system from DECOSUP, an acronym for Decorative [Concrete] Supplies. They are based in Miami, FL. I used their product here in St. Croix, for one really good reason; the concrete stain they manufacture is a low acidic product, compared to Acid Based Stains, which contain hydrochloric and / or sulphuric. It should come as no surprise that acid is a hazardous material, therefore, read: HAZMAT shipping costs, which are prohibitively costly, especially overseas!
 The finished product, after grouting the seams between the tiles! Ha ha, as if. I have to polish the final product with terrazzo floor wax, NEXT WEEK!
posted by David at 7:43 AM
0 comments
![]()
![]()

 Scrub the spots with a wire brush and discover the emerald green you'd hope to have for an end product....

posted by David at 11:18 AM
0 comments
![]()
![]()
 , we had a top coat of concrete poured over the rough, what I call sub-floor. Which is the steel reinforced concrete slab through which the plumber and I coursed several conduit runs, and the plumber his water supply lines, hot and cold; as well as waste piping.
In this series I show you the stages of preparation and application for scribing and staining concrete floors. This is my second attempt at this craft, O.K. third try, our Harwich, (MA) barn was project one, the master bathroom in 71 Vista Concordia; and, now, the West Wing. The blue room, above, is in the process of protection from water based concrete stain application. We covered the lower 12" of the walls for this protection, sealed top and bottom to prevent leakage behind the protective membrane. We will leave this in-place until the floor is stained, scored, rinsed and the mildly acidic stain is neutralized; and, finally, sealed with a lacquer based concrete sealer.
We are using products from a company in Florida, under the name of Decosup, or decorative concrete supplies. Decosup's floor stains are a non-acidic solution which don't require HAZMAT (Hazardous Material) shipping. After all, shipping to this Island, 2,300 miles from Miami, FL, is expensive enough as it is for normal shipping rates. This shot of the south bedroom, sorry, the blue room, viewed down the Greenie Beanie (the name of the paint color) hallway, shows the application of the 1st stain coat, note the plastic film wall protection, taped to the wall top and bottom.
That black, cylindrical. & hosed aparatus in the center of the doorway is the stain applicator. I simply pour in the stain, pump up the pressure and pull the pistol grip handle to spray the liquid on the floor.
The vacuum cleaner I use for dust collection, and the floor jig for cutting straight lines is on the floor. The jig consists of two pieces of 1/4" masonite held parallel at the right dimension to allow for the concrete saw's footprint. This insures a straight and unwavering cut in the surface. The white cement, used to pour this layer, is extremely hard at this point, being fully cured now for several weeks. The handle of the saw pokes out of the closet at left of photo.

posted by David at 8:11 AM
0 comments
![]()
![]()


posted by David at 12:53 PM
0 comments
![]()
![]()
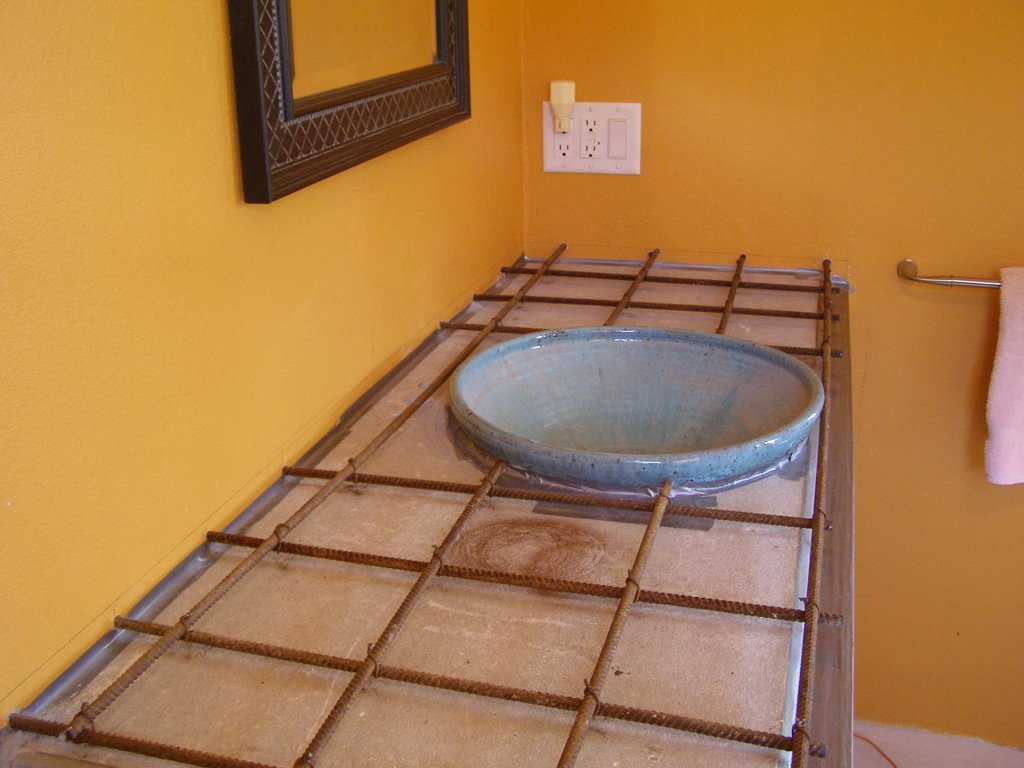
 Seen here, in these exclusive photos, the kitchen counter top is being readied for the concrete. The forms are in place around the counter's edge, the 3/8" rebar placed, and tied, at 6" intervals; the pvc pipe stubs can be seen poking up through the cement board base. The grid of rebar helps to strengthen the slab and makes it less likely to crack from shrinkage.
 The pvc pipe stubs are for the faucet and sprayer, yet to be installed. The same shot, of the same sink cutout, during the "pour". You can see the glass like surface of the wet concrete in the next photos. The water will evaporate as part of the curing process, which also includes the production of heat, as the mix of cement sand changes from a liquid into a solid.


Labels: pouring the kitchen counter top
posted by David at 11:26 AM
0 comments
![]()
![]()
 The Master Bathroom is the first room we have completed. In this series of photos you can see the bath vanity top, and the above-counter sink, as the ensemble is being constructed. I say above-counter because the sink was intended to mount in a vanity top, lower than the height we wanted of 36", or kitchen counter height.


posted by David at 1:40 PM
0 comments
![]()
![]()


