Let it Pour!
click on all images to enlarge
And so we enter the construction phase, this is a perfect follow up to doing practically nothing the past month or so, as the hole was dug deeper and ever deeper into our pockets.. er.. ..I mean the earth.
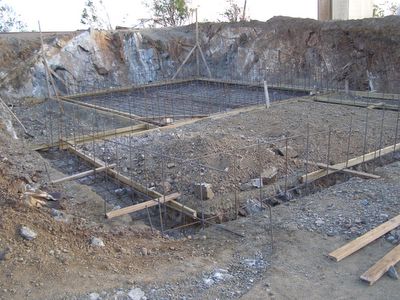
Much hand work was necessary to dig the footings around the perimeter of the cistern, in the background in this photo, and the apartment in the foreground. The footings are 12" deeper than the rest of the slab itself, which is the floor of the cistern, will be six inches or so thick. Notice the vertical steel reinforcing bar (rebar) which is stubbed up into what will be the poured concrete walls of the cistern, these are placed on 12" centers, in line with the rebar you see in the flat areas.
Because this is a poured concrete cistern you can also notice some wooden members tied in place around the perimeter, these will actually be pulled out after the concrete has cured. The resultant rabbet, or slot, is called a keyway, this will hold the poured concrete walls in place, permanently locking them to the footings. There is a center partition within the cistern itself, you can see the stub-ups of rebar set in place. This center partition is going to support the great room wall above it and it divides the cistern in half. This partition will not have any stresses on it, therefore it doesn't need a keyway to lock it in place. There is a washover window cut into the center partition, which will balance the amount of rainwater in each tank.
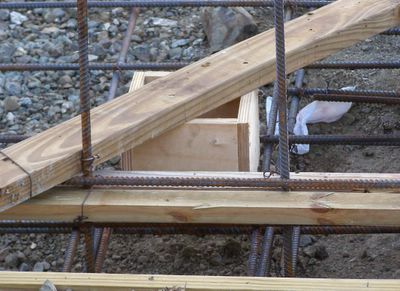
This close up photo shows clean-out trap, installed in one corner of each cistern half. The concrete floor will be troweled so that it is pitched to that corner. This is used when cleaning the cistern on the inside and is a very important step. Our cistern will hold approximately 33,264 gallons of water collected, hopefully, off the roof gutters, leaders and downspouts. Filled to capacity it will weigh-in at 57.7 tons, and that's without the weight of the concrete under-house swimming pool!
This concrete box must be water proofed on the exterior also; this is done as we do up north, with foundation tar. Black, gooey and stinky, Debbie and I can attest personally for the experience, having done our Harwich house back in '95. Don't get any on yourself if you can help it. We are not going to tar this cistern ourselves, we are paying somebody to do that for us.
I am going to waterproof the inside of the cistern with a fairly new product called Xypex. This product can be added to the concrete batch, slightly before it is poured into the forms, or, it can be mixed with water and which forms a thick slurry liquid the consistency of wallpaper paste. This product is then brushed or rolled on the inside of the tank, from top to bottom, every surface that will get wet inside the cistern. Before the Xypex is applied, the walls and floor are first wet down, it then permeates the solid concrete, drawn into the concrete by the water itself. Once the slurry is applied and allowed to react with the chemicals present in the concrete itself, the tank is protected from water incursion from either the negative or positive side of the tank.


0 Comments:
Post a Comment
<< Home